Wednesday, June 11, 2008

Giant SNES table Phase II: Bondo and Sanding

I used my belt sander to first sand the curves down even. It dosn't get them super smooth, but it sure eats up the mdf quickly! I got it down pretty close, then used my mouse sander to smooth it out nicely.


Mouse on the left, belt sander on the right... Nice curves, huh? it gets better.

I then covered pretty much the entire outside curves with bondo. I recommend if any of you use bondo to only mix up a little at a time and do it in segments. The stuff dries up wicked quick. I used a putty knife to smooth it down, to ease the sanding process later.

I then spent about an entire day sanding the sides smooth. A little with the belt sander, but mostly the mouse. The belt sander eats up the bondo even faster than the mdf. I came out of the process looking like I had just killed frosty the snowman. Seriously, that stuff got everywhere.


I also cut out a back plate and started sanding it down smooth. The curves on the edges of the back plate are going to be much larger than the top. I've also decided to either go with legs screwed onto the backplate, a temporary box-like support, or no support at all and set it on my audomin for now, which will most likely happen until I figure out how to permanently support it. Any suggestions? I won't put any support on it until its 100% finished anywhays. I would like to avoid making a chest out of it like Kyle did on his NES controller simply because the curves on the side would make the chest too small, though it works beautifully for the NES controller. I'm thinking about going with the 4 simple table legs so it looks like a coffee table while still maintaining that controller look. It would also make it look nice if I end up going with the glass top look.
I'd say 40 inches wide is about the right size... its scaled up by 7.2 times the size of the original controller.
Note: (june 26 2008) I have actually done quite a bit more work on the controller, but havn't posted pictures yet. They should be up soon. Shes lookin quite nice, a pretty niceeee...


Sunday, June 8, 2008

Giant SNES table Phase I: basic shape

So heres the big one, this is the most insane project to date. Inspired by the NES coffee table (http://ultra-awesome.blogspot.com/2008/05/nes-coffee-table-final-post-rah.html) I decided to give a try at the large nintendo controller. I am a huge SNES fan, its what I was raised on, so even though the curves make it a much more difficult controller to shape, I decided to give it a try... and heres the outcome.

This is phase I: the basic controller shape, next I'll post Phase II: Sanding and bondo.


I actually CAD'ed the entire controller with the help of Andre and took it up to office max to print it up full size (I'll post a picture of the CAD drawing when I get a chance). I then traced the outline and details, then cut it out with my jigsaw.


I cut another controller shape out of yuca board in order to give the circle around the D- pad a little definition, then glued and clamped this to the mdf. I cut these curved pieces out of 3/4 mdf with my scroll saw and used wood glue to attach them so I would have a clean top to the controller with no screws. The back plate will screw on though so it can be removed for repairs and such.
Clamping the straight pieces on.
Clamping the 5th curved piece, I had to buy 12" clamps for this... the gator clamps lost their use after 2 or 3 pieces.

The last pieces glued in place
There she is, though very rough and unsanded. This was a funny looking piece of scrap from cutting out the circular outside pieces. To fit them best I made them in a spiral pattern, and this fetus creature came out of the middle.

First project: surfboard fins

EDIT: 12/8/14 I've gotten a lot of requests to make fins and sell them, but unfortunately I don't have the time to make these in bulk. It is a labor intensive process to even make one set. My recommendation if you have at least one fin, is to make a urethane mold of it. Then use the mold to layer fiber glass sheets. If not, the first method I used to fiberglass over an MDF core was still a fairly reliable method until it wore down to the core and split. I better quality wood or other material less likely to split when wet would be a good alternative. Good luck!

________________________________________________________________
So this was our first project ever, and it came out impressively nice. I had an old early 80's WRV surfboard passed down to me by my Dad. Its an awesome board, but I came to find out they no longer made fins for it (G & S star system fins).


This is the original fin I used as a master copy... It is no longer made and I had to go to 13 different surf shops to even find this one... but only one. It was in a scrap fin box, but they still charged me $25... so I decided to try and fabricate my own fins.


This is the board, quite a nice looking board if I do say so myself... and i do.
This is the MDF fin we cut out and sanded. At this point we still had no idea how they would secure to the board.

The fin was then fiberglassed and sanded back down to shape.
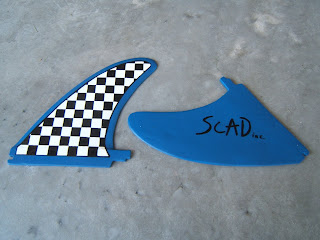
And then they were painted, We are all quite big checker fans, and the blue blends so nicely with the board.


.... ya.


And now on the board.


So this was a failed attempt to later make fins out of plexiglas, not a good idea, they looked sweet and fit perfectly, but snapped on day 2.


First day of testin' them out, quite nice. They ended up lasting over a year, and only because the fiberglas eventually rubbed down and the MDF split, this has been since remedied by putting a little bit of fiberglas resin on the tips every now and then. I've also made a set of batwing fins that I currently have on, I'll post pics of them at some point.


beach fun.


Edit: (June 26, 2008) So apparently the locks I made for the batwing fins didn't hold up well enough, because I lost one at sea last time. I made another set similar to the original checkered ones, though these I didn't paint. They actually look kinda cool, you can see the weave of the fiberglas cloth a little, and they have a greenish tint. Quite sturdy as well I must say. These ones better stay in. I've streamlined the building process, but they still take about a day to go from blank mdf to fins secured in the board.


Edit: (August 21, 2008) The fins I made started bending because there was a small hole in the fiberglass that allowed water to get into the mdf and swell. I dried them out and sealed them up, but still wasn't too confident with the mdf… My new plan of action was to find a way to make the fins entirely water proof, thus removing the mdf core. A solid fiberglass fin makes sense, seeing as that’s how most of them are actually made, but the fiberglass I can get a hold of is not as strong as the what real fins are made of… A compromise was reached. First I vacuum formed the first set of fins (the checkered ones), creating a lexane mold. The good thing about this is that each sheet of lexane is about $2.50, so they're pretty much disposable if they don't make it through the entire mold process (One ended up surving, and one cracked in the mold release stage, but the good one was so gunked that I trashed it anyways). So with the molds I used petroleum jelly as a mold release, coating the insides of both of them. I then layered the molds with resin and cloth. I used 2 sheets of cloth per fin, so I layered them with resin-cloth-resin-cloth-resin… then placed a sheet of wax paper over top to get a clean surface. The entire process suprisingly worked quite well. The mold release worked pretty decent, though I wasn't to worried about breaking the lexane to get the fin out. Once I pulled out the fin I scrolled off the edges that needed to be straight, with vacuum forming its quite tough to get 90 degee edges, but no biggy, just needed a little cleaning up. I then tested them for strength, they seemed to bend a little easier than I liked, but seemed quite tough, so my solution was to cut them down. Now that I think about it I could probably make the lexane fins again, but make them a little shorter as well, its worth a shot. Either way, I've successfully made a fully water proof set of fins that look sweet and have survived a 3 day surfing camping trip with no complications. If these ones last a year without any problems like the first set I'll be happy. I'll give the lexane fins another shot eventually. Oh, and on a side note, I saw an old twin fin Challenger surfboard at COS surf in Jax beach with two perfect clear G & S Star system fins… but the owner had it as a collector board, not for sale! I just about flipped out, the only complete set I have ever seen with my own eyes, and they were unattainable. He said the only valuable thing about the board were the fin box/ fins… ya, tell me about it.


Well I'll put up pictures soon of the whole process, and the final fins on the board. As well as posting the SNES controller pictures soon.


Heres the new process.


I've also been trying some vacuum bagging of prepreg carbon fiber... Here's what I've got so far